Tuesday, April 14, 2015

Vintage car collage


Luke is in love with cars since he could crawl. He is totally obsessed with them. He would pick cars over balls or perhaps cars over mummy!
I found this collage idea off a children's activity book sometime ago and had always wanted to give it a try. Recently I have been trying to work on not procrastinating and valuing time. (This is a separate dialogue altogether)
It's probably more for a 5 year old child art and craft activity. But adults could help little ones in terms of drawing out the template and letting them cut and glue them. Little ones could attempt to decorate the car in any way they like.
Materials:
Colored paper
Scissors
Glue
Pencil
Black felt pen
Images of vintage cars for inspiration
I drew out main body parts. Likely 3 parts, one for the front, body and back.
Then I cut them out and glue them (leaving a small space between each part)
Then using a black felt pen to trace the car and draw in the wheels and details of the car.
I plan to share with Luke and Sophie this picture and also pictures of modern day cars. We could delve into details about the evolution of cars. I'm sure my husband would love to join in too!
Please share with me your pictures of  vintage car collage. I'd love to be inspired by your creativity!

Sunday, April 5, 2015

Happy Easter Day!

It's Easter Sunday! Egg hunt, chocolates and bunnies? Though it might be for most people here in China, we wanted our kids to learn the real meaning of Easter.

I just kept it simple for the family.  We did a sun catcher of a cross and placed it in our front window for the kids and our neighbours to remember that Jesus died on the cross to save us from our sins.

It was an easy activity for everyone and it was pretty fuss free. We talked to Sophie about the meaning of Easter and what happened on Good Friday and Easter Sunday. I have provided directions to make the suncatcher at the end of this blog.

At bedtime, we read our daily bible devotion for children to the kids and taught them the Lord's prayer and we sang some worship songs. 

Next year, when we are back home, we will take the kids to attend Sunday service  with family and friends. 

His love endures forever. Amen.

Materials for Suncatcher:

Hard paper or thin cardboard for frame
Contact paper
Colored cellophane paper
Sticker gems 
Washi tape
Double sided tape
Scissors

Cut out the shape of a cross on a hard colored paper and stuck the contact paper on one side. I used double sided tape to tape the back of the cross (sticky surface facing out) to a window.

I cut out strips of colored cellophane paper and the children cut them into squares or rectangles. We used pink, orange, green and clear as I wanted to have a spring look.

We stuck the colored paper and then I used washi tape to tidy up the borders as some of the colored paper would stick out of the cross. Once finished, we placed some pink sticker gems on the cross on both sides so that it sparkles on both sides.

I hope you enjoy this simple craft with your children. 


Saturday, April 4, 2015

Kids friendly coconut macaroons

This weekend, I found a really easy coconut macaroon dessert in one of my favourite cook book. It's so simple and easy that my 4 year old could make it and all I did was to help put it into the oven. It smells and looks good and is also very light.

It makes a great sensory activity as the textures of the ingredients are very different and the kids could feel them and taste them. Just don't offer them raw eggs!

It took about 10 minutes to prepare and another 15 minutes baking time.  C'est simple!

Here's the recipe:
4 tablespoons desiccated coconut
2 tablespoons powdered sugar
2 tablespoons cornstarch
Pinch of salt
1 egg

Preheat oven to 350F
Mix all the ingredients into a bowl.
Mould them into small balls and place into a baking tray with parchment paper.
Bake 10-15 minutes

The kids had these little bites with a cup of milk before bedtime. Next time we will invite some friends over for tea and bake some of these lovely coconut macaroons.
Bon appétit!

Friday, April 3, 2015

Time

time
 16making the most of every opportunity, because the days are evil (Ephesians 5:16)
In my waking moments, I am pulled towards every direction. Every person, animal, activity seem to be calling out for me. Many a times, I do wish I could clone myself and accomplish more and please everyone, including myself. But alas, this is not the case. Then I got thinking about what the bible could teach me about time, reflect on his Word, pen my thoughts and apply his Words to my life.
Recently, a friend had asked for help in being a translator. We live in China and she does not speak mandarin. I do speak some mandarin and can get by with it so far.  She had bought items over the internet and the seller could only transact in mandarin. For one, it’s easy to just see what you like and click to buy even though the site is in mandarin. After all, a picture tells a thousand words. She had asked and so, I had kindly offered my help to be the point of contact for the seller in communications regarding delivery matters. I had highlighted to her my response time would occasionally be delayed when as I needed to care for my 2 year old son and I don’t always carry my phone around. She agreed and said she understood. I started receiving a myriad of calls from sellers and delivery companies asking for information, and timing of delivery. I had no clue what she had bought and what transpired as a simple act of kindness turned into a nightmare. I had become a part time secretary overnight. I had to pick up calls at ungodly hours, arrange with her and get back to them. Should issues arise, I also had to help resolve them and provide solutions to both buyer and sellers. In my 10 months shopping online in China, I never had encounter such problems.

Then, I found out that when she could not reach me, she would contact other friends and this resulted in duplication of efforts and mixed messages to the seller. It became frustrating for me as I had to constantly take time out from the kids to handle those calls. For a while, I tried being optimistic, telling myself to take this as a challenge in improving my mandarin. But deep down, there’s this nagging feeling that says something is not right. Time is so precious to me and what I do has to be worth it.

Today. I decided to look to the Bible. I looked into Ephesians 5:16 and also read Matthew Henry's commentaries for insights. 16making the most of every opportunity, because the days are evil”.
Our time here is short; every moment is an opportunity cost. (I just lost 3 minutes taking a call for that friend instead of writing this post, sharing about God’s word). Why? More often than not, it’s the urgent things that are always pulling us away from the important things. The important things wait quietly and patiently in the background until it can no longer do so and it becomes too late and regrets sets in for us.

How then should we make good use of our time when situations like these arises?

Learn to say NO. In Matthew Henry’s commentaries, he says "Our time is a talent given us by God for some good end, and it is misspent and lost when it is not employed according to his design. If we have lost our time heretofore, we must endeavour to redeem it by doubling our diligence in doing our duty for the future.” All the time I spent taking those calls and getting frustrated in front of my children needs to be fixed with twice the effort now. I had to explain why I was taking those calls and why sometimes I had to be loud on the phone. I had to spend time calming down myself whenever those calls came in with problems while my friend was at the gym working out; unbothered by these problems that she had given me. I thank God that this lesson is not a long drawn out one and that it has made me realize how time should be used. Wisely. Going forward, I shall take time to pray and ask if what I embark will please Him. Taking time to pray and plan will help in the long run. It is never too late to say NO to an activity or an urgent task. In fact, I shall inform my friend tomorrow that I will be unavailable to assist her in her shopping matters in future. What might happen? Lose a friend? Maybe, maybe not.

I ask myself, what if the situation was turned around. What should I do? Be sincere, honest, helpful and appreciative. Don’t take people and their time for granted. This also teaches me to value other’s time and be respectful of their time.

I shall end my note with this: Take good care of time and use it wisely to glorify God. Have courage to say NO.

Friday, December 19, 2014

Keepsake of children drawing

I love Sophie's depiction of people and wanted to create a keepsake of her drawing at this age. I also love making small surprises for the family, so I decided to turn one of Sophie's drawing of daddy and turned it into a pillow case for my husband.
He adored it so much and suggested that we do a series of her 'Picasso' people onto pillows for the family room sofa set.

I traced her drawing on a cloth and used embroidery thread to sew the traced lines. After that, I used some fabric cloth and sewed a simple pillow case.

It took me 2 hours in actual work but with taking Luke for a walk in the park and feeding ducks, lunch and putting him to nap, I took a total of 6 hours from start to finish. I guess I just had to be patient and do it in small steps.

It was an enjoyable experience for me and I know it means a lot to Sophie and daddy too.

Friday, October 10, 2014

Big picture

Feeling down and dreary about being a full time mom?
Here's a quote I picked up from the book "The parenting book" by Nick and Sila Lee
"Parenting requires seeing the big picture.  And every day makes a difference to our child's development and wellbeing"

To all parents out there,  HANG IN THERE!

Monday, August 18, 2014

Living in Shanghai

Shanghai! We've been here almost 2 months. Our art supplies have not arrived and we have been taking time to enjoy our surroundings. Our complex is lovely! It's like an adventure every time we head out.

Exploring and admiring God's work. What a treat!

I hope to share more photos and inspiring activities during our stay here.

Keep checking in! Cheers. 

Friday, June 13, 2014

Healthy snack for the soul

Blueberry soy muffin for a healthy afternoon tea.

I have been looking out for healthy snacks for the children and wanted to use what we had in our pantry instead of going to the grocery...again.
With coconut oil, blueberry, 1 egg and soy milk, and little time, I decided muffins would be best.

Recipe for 7 muffins as follows:
Dry ingredients:
1 1/2 C unbleached all purpose flour
2 tsp baking powder
1/4 tsp salt
1/2 tsp ground cinnamon

Wet ingredients:
1 egg (room temperature)
1/2 C granulated sugar
1/2 C soy milk
1/4 C coconut oil
1/2 tsp vanilla extract

1 C fresh blueberries
Coarse sugar for sprinkling (optional)

Directions:
Preheat oven 200 degree Celsius.
Line muffin tray with muffin case or spray with non stick spray.

1. In a large bowl, mix all the dry ingredients together and set aside.
2. In a medium bowl,  whisk together egg and sugar until combined. Add in oil, soy milk and vanilla extract. Mixture will be pale yellow.
3. Fold wet ingredients into dry ingredients in 2 batches. Batter will be thick and lumpy.
4. Fold in blueberries
5. Pour batter into prepared muffin tray, filling all the way to the top. Top with sugar sprinkle if preferred.
6. Bake at 200 degree Celsius for 5 mi s then reduce to 180 degree Celsius for another 10-15 minutes until tops are slightly golden. Test for doneness. 
Remove from oven and allow to cool for 10 minutes before enjoying it.

Sophie totally enjoyed it and had 2 muffins at one seating. Wow!
Perhaps the next time, I'll bake with her as this is really easy for a toddler to have some sensory play and learning about food.

Wednesday, May 28, 2014

Independent play

Getting a 3 year old to follow instructions is a challenge. But a little preparation goes a long way. We did a simple activity to make bubbles.
A little preparation on my part - no more than ten minutes. Setting up the props such as bottles for water, golden syrup, dishwashing liquid, cups, bowls and tablespoon.  Did a visual presentation on a board with the steps.

When Sophie saw the set up, she was excited and ready to start. I gave a simple explanation on what she was going to make and the materials that we had. Showed her the visual aid on the board and it was self start. It's a simple activity that builds independence, counting and measuring, motor skills to pour and mix and sensory when the solution is done.

The results were encouraging and I intend to try other activities such as making puffy paint and slowly moving to making her own muffins by herself. 

Children need to be in control and this is an activity that gives them that!

Friday, May 16, 2014

DIY Stamps

Some time ago, I was into making my own stamps for Sophie to play with. Simple shapes that she can identify with and not have to spend lots of money on stamps. Art stuff are expensive here in Singapore!

So, I went to a thrift store and got some wooden blocks and some craft foam. Cut out the craft foam according to the shapes and sizes of the blocks that I like to have. Used a hot glue gun to adhere the craft foam to the wooden blocks.

After that is done, I drew the shapes on the opposite end of the foam and painted it so we know what shapes we had.

You could either use an ink pad or paint.  I chose paint because Sophie tends to move from color to color and I didn't want the ink pads to have mixed colors. She ended up with finger painting after the stamping session.

Supplies:
Craft foam
Wooden blocks of different sizes
Scissors or craft knife
Glue gun
Paint

All in all, we spent less than $6.00 and there were plenty of craft foam and wooden blocks left to make more in future.

Tuesday, May 13, 2014

Vibrant edible paint

My one year old loves putting things to his mouth. While I know most paints for children are non toxic, I wasn't quite comfortable with him eating huge quantities if it happens. I found a site for homemade edible paint using cornstarch, water and food coloring. This was good for us and I made a small batch to try out. It turned out really well in terms of color and my three year old ended up with all the fun as the little one was napping. 

I picked 3 colors that complemented each other. Pink, blue and yellow. While playing, she discovered green, orange and purple.

We used aluminum foil instead of paper as that is sturdier than paper and it reflects the colors very well under the afternoon sun. 

Overall, Sophie had a fantastic time. Can't wait for Luke to wake up and try this out.

I experimented a little for the paint to get the right texture that I wanted. 

2 cups cornstarch
1 cup cold water
4 cups boiling water
Food coloring (I used wilton food coloring gel)

Stir 1 cup of cold water into the cornstarch.  Pour the hot water cup by cup and stirring between each cup.
Try to achieve a custard like texture. If it fails, put it under stove,  medium heat for 1 minute and the solution should thicken.  Stir out any clumps.
Pour into bottles and add coloring of your choice.

Adapted from this site.

Wednesday, April 30, 2014

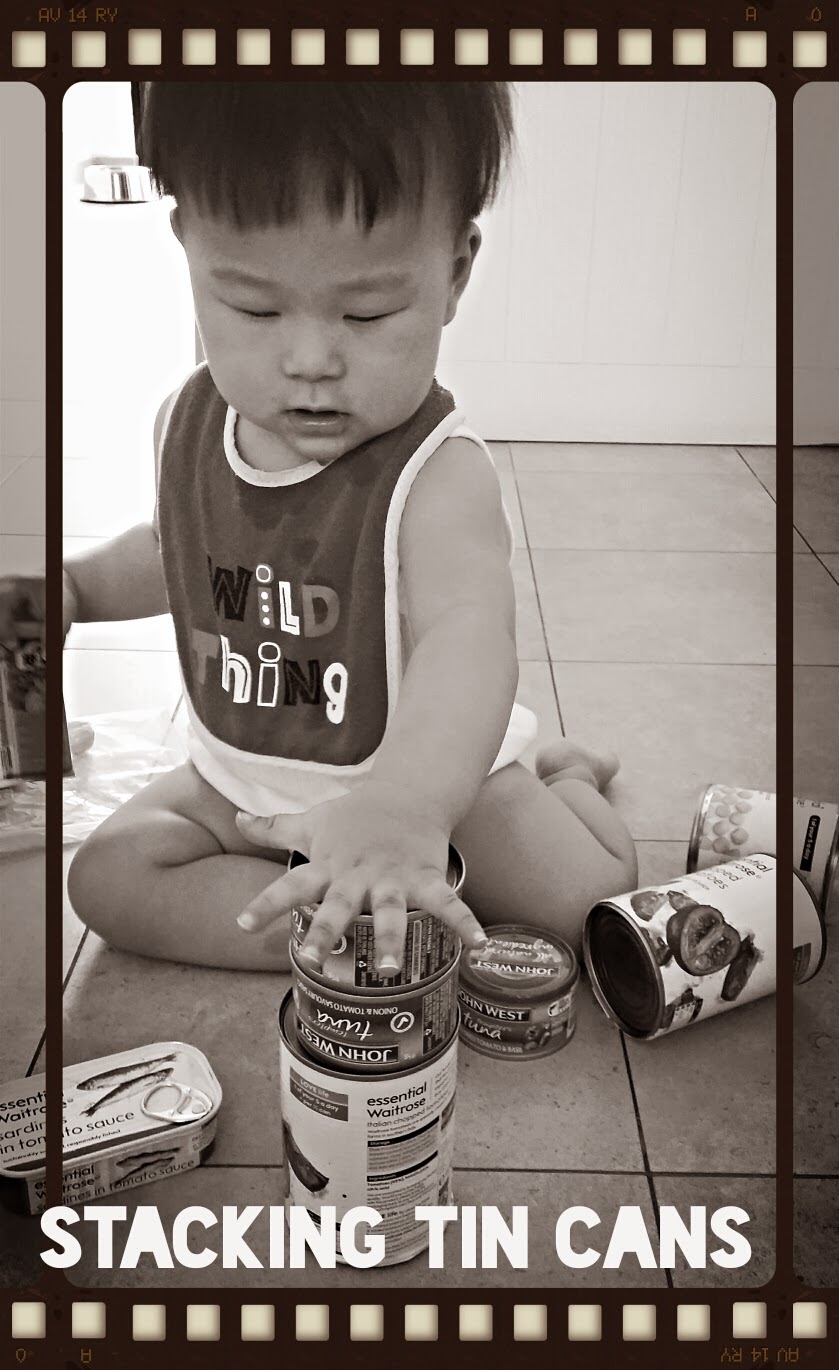
Building 'blocks' using canned foods

Building blocks with stuff from home. Our household has a few canned food such as baked beans,  tuna,  tomatoes, etc. Luke prefers playing with these canned food over the wooden blocks. Perhaps these cans are different in sizes, shapes and weight. He fiddles with them, rolls them around and sometimes drops them to hear the sounds it makes. Thought this is a quick way to keeps young ones entertained for a while and also introducing them to different attributes of the objects.  What items do you use for building blocks other than wooden ones?

Friday, April 25, 2014

Pink Friday! Play dough fun

Sophie loves play dough and she loves pink! What a better way to spend a Friday afternoon playing with this while Luke is napping. 

All supplies can be found at home. It's homemade play dough (not gluten free)

Recipe for play dough as follows:
1 cup all purpose flour
1 cup water
1/3 cup salt
2 tablespoons cream of tar tar
1 tablespoon of vegetable oil
Sprinkle of cinnamon powder (optional)
Food coloring (your choice)

Combine all ingredients (except food coloring) into a pot and turn on the stove. Stir the mixture until it clumps up and forms a sticky dough (about 3 minutes)

Remove the dough and let it cool a little. Divide into portions and add coloring of your choice.

We usually play the dough in a tray and add a few items (rolling pin, beads, goggle eyes, etc) for her imagination to have free play.

Do share with me ideas on setting up a play dough activity that will entice your child to play. Cheers and have a good weekend!

Thursday, April 24, 2014

Alberto Giacometti inspired sculpture

This was a fun project for me instead of Sophie. Perhaps an older child will enjoy it better as it requires patience and certain dexterity.

Supplies:
Pipe cleaners
strips of aluminium foil
A ball of paper (for the stick man head)
Play dough or blue tac

Steps:
Take 1 pipe cleaner and make a loop in the center for the head. This piece will make the head and the arms

Take 2 pieces of pipe cleaners for the legs. Use the arms to secure them tightly. Twist the 2 pipe cleaners a few times to make the body.

Put a ball of paper in the loop and start using the strips of aluminium foil to wrap it.

To make it stand, attach balls of play dough and wrap the foil around. It is quite challenging making it stand after a few tries, it will find its equilibrium.

Watercolor spray artwork

I love watercolor. Liquid watercolor especially! There are lots of art activities that can be done with it and today, we did a simple one. Dilute the liquid watercolors in spray bottles, set up paper and start squirting away.

Supplies:
Spray bottles (clear ones are preferred)
Liquid watercolors (your choice)
Butcher paper
Scissors
Tape or peg

We had a splendid time spraying away and what's best is we are going to use these as wrapping paper afterwards. 

Wednesday, April 9, 2014

DIY story telling board

Sophie has a wild imagination and we love making up stories. I decided to make a story telling board with some stickers, magnet sheets and a white board. I stuck the stickers to the magnet sheet and cut them to size. Voilà!

We could also draw on the board and have the little magnets placed on it to tell a story.

I may try one with a tea party or dress up doll version.

I think it makes a great start for story telling and also quiet time activity for toddlers. 

Happy to hear your views. 

Sunday, April 6, 2014

What's your family motto?

I've been meaning to do this....a family motto or values that are important to us. Here's a sample of what I've done up so far. Working on finalising it and will bring it to the printers to blow it up and perhaps frame it for the family dining area. Do you have one for your family? I would love to hear about it.

Emotional state of mind

And this is just the tip of the iceberg.

Wednesday, April 2, 2014

The Giving Tree (Story, Art, Learning)


By Shel Silverstein


I love this book. We have been reading this book fairly often over the past one year. It’s a simple and heartwarming story about a tree’s unconditional love for a boy when he was little till he turned old.


This week, I decided to use this book as a starting point for art and some learning time for Sophie. I drew up a tree on a large piece of paper and labelled it with the different parts of the tree. Placed a palette with green and yellow paint and a couple of brushes. When Sophie was up from her nap and saw it, she went straight to it and started painting away.

We talked about the different parts of the tree such as the roots, trunk, branches, leaves, flowers, fruits and animals that live in trees. We also looked at the papaya tree that we had planted together. I have one that we planted months ago and another a couple of weeks ago. We planted these trees from seeds. In this way, Sophie was able to see the stages of a plant. Papaya seeds are really easy to grow in Asia. I repurposed an old milk carton to germinate the seeds. We watered it everyday and within 2-3 weeks, we saw the sprouts peeking out of the soil. It was a beautiful sight. In another month or two, when the plant is slight bigger, we will plant it into the garden. And with the repurposed milk carton, all we need is to cut up the carton and put the soil and plant into the ground. In this way, we avoid hurting the roots of the plant.

In the next week, I plan to dig deeper into this subject. We will make a trip to the botanic gardens to do tree bark rubbings, leaf printing, create a little catalog of the trees that we have seen.