Friday, June 13, 2014

Healthy snack for the soul

Blueberry soy muffin for a healthy afternoon tea.

I have been looking out for healthy snacks for the children and wanted to use what we had in our pantry instead of going to the grocery...again.
With coconut oil, blueberry, 1 egg and soy milk, and little time, I decided muffins would be best.

Recipe for 7 muffins as follows:
Dry ingredients:
1 1/2 C unbleached all purpose flour
2 tsp baking powder
1/4 tsp salt
1/2 tsp ground cinnamon

Wet ingredients:
1 egg (room temperature)
1/2 C granulated sugar
1/2 C soy milk
1/4 C coconut oil
1/2 tsp vanilla extract

1 C fresh blueberries
Coarse sugar for sprinkling (optional)

Directions:
Preheat oven 200 degree Celsius.
Line muffin tray with muffin case or spray with non stick spray.

1. In a large bowl, mix all the dry ingredients together and set aside.
2. In a medium bowl,  whisk together egg and sugar until combined. Add in oil, soy milk and vanilla extract. Mixture will be pale yellow.
3. Fold wet ingredients into dry ingredients in 2 batches. Batter will be thick and lumpy.
4. Fold in blueberries
5. Pour batter into prepared muffin tray, filling all the way to the top. Top with sugar sprinkle if preferred.
6. Bake at 200 degree Celsius for 5 mi s then reduce to 180 degree Celsius for another 10-15 minutes until tops are slightly golden. Test for doneness. 
Remove from oven and allow to cool for 10 minutes before enjoying it.

Sophie totally enjoyed it and had 2 muffins at one seating. Wow!
Perhaps the next time, I'll bake with her as this is really easy for a toddler to have some sensory play and learning about food.

Wednesday, May 28, 2014

Independent play

Getting a 3 year old to follow instructions is a challenge. But a little preparation goes a long way. We did a simple activity to make bubbles.
A little preparation on my part - no more than ten minutes. Setting up the props such as bottles for water, golden syrup, dishwashing liquid, cups, bowls and tablespoon.  Did a visual presentation on a board with the steps.

When Sophie saw the set up, she was excited and ready to start. I gave a simple explanation on what she was going to make and the materials that we had. Showed her the visual aid on the board and it was self start. It's a simple activity that builds independence, counting and measuring, motor skills to pour and mix and sensory when the solution is done.

The results were encouraging and I intend to try other activities such as making puffy paint and slowly moving to making her own muffins by herself. 

Children need to be in control and this is an activity that gives them that!

Friday, May 16, 2014

DIY Stamps

Some time ago, I was into making my own stamps for Sophie to play with. Simple shapes that she can identify with and not have to spend lots of money on stamps. Art stuff are expensive here in Singapore!

So, I went to a thrift store and got some wooden blocks and some craft foam. Cut out the craft foam according to the shapes and sizes of the blocks that I like to have. Used a hot glue gun to adhere the craft foam to the wooden blocks.

After that is done, I drew the shapes on the opposite end of the foam and painted it so we know what shapes we had.

You could either use an ink pad or paint.  I chose paint because Sophie tends to move from color to color and I didn't want the ink pads to have mixed colors. She ended up with finger painting after the stamping session.

Supplies:
Craft foam
Wooden blocks of different sizes
Scissors or craft knife
Glue gun
Paint

All in all, we spent less than $6.00 and there were plenty of craft foam and wooden blocks left to make more in future.

Tuesday, May 13, 2014

Vibrant edible paint

My one year old loves putting things to his mouth. While I know most paints for children are non toxic, I wasn't quite comfortable with him eating huge quantities if it happens. I found a site for homemade edible paint using cornstarch, water and food coloring. This was good for us and I made a small batch to try out. It turned out really well in terms of color and my three year old ended up with all the fun as the little one was napping. 

I picked 3 colors that complemented each other. Pink, blue and yellow. While playing, she discovered green, orange and purple.

We used aluminum foil instead of paper as that is sturdier than paper and it reflects the colors very well under the afternoon sun. 

Overall, Sophie had a fantastic time. Can't wait for Luke to wake up and try this out.

I experimented a little for the paint to get the right texture that I wanted. 

2 cups cornstarch
1 cup cold water
4 cups boiling water
Food coloring (I used wilton food coloring gel)

Stir 1 cup of cold water into the cornstarch.  Pour the hot water cup by cup and stirring between each cup.
Try to achieve a custard like texture. If it fails, put it under stove,  medium heat for 1 minute and the solution should thicken.  Stir out any clumps.
Pour into bottles and add coloring of your choice.

Adapted from this site.

Wednesday, April 30, 2014

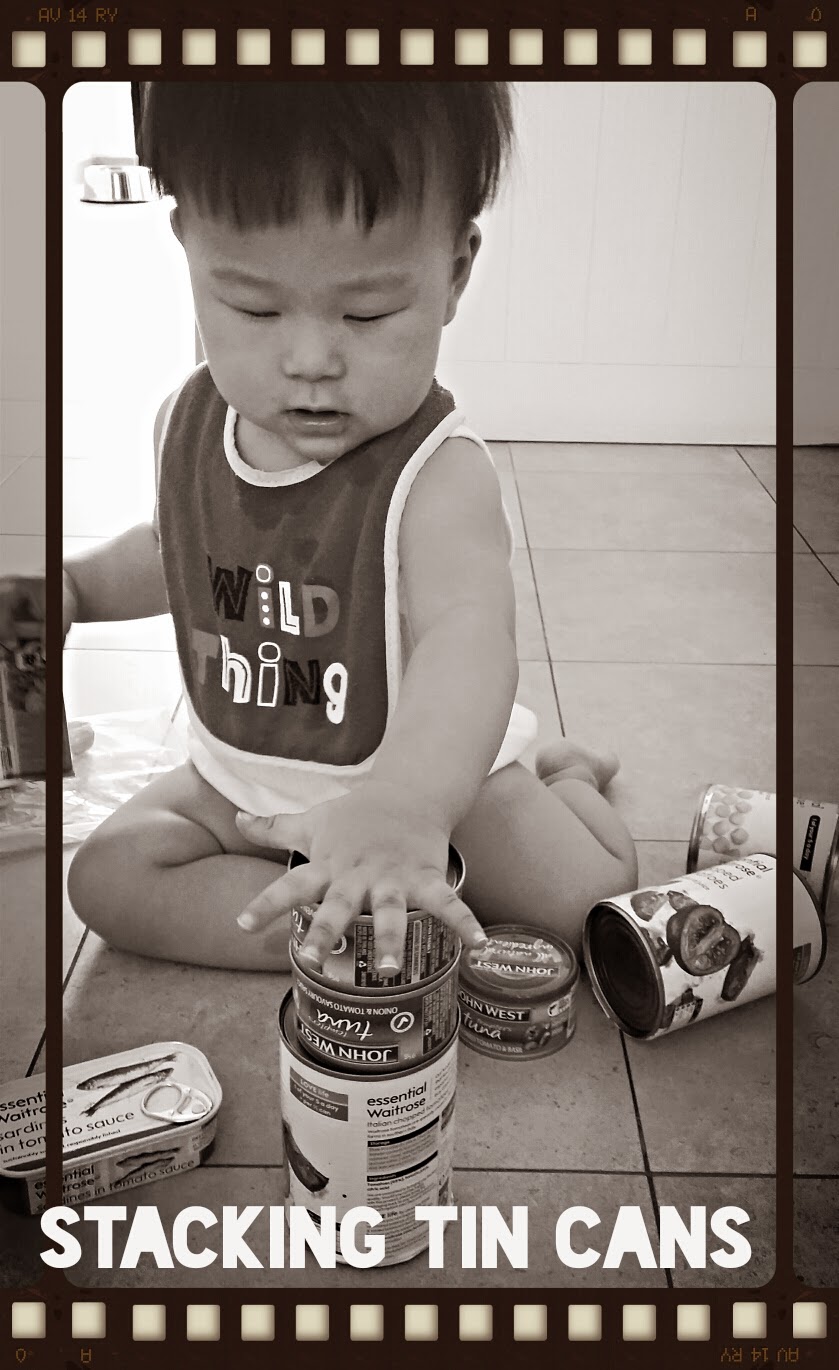
Building 'blocks' using canned foods

Building blocks with stuff from home. Our household has a few canned food such as baked beans,  tuna,  tomatoes, etc. Luke prefers playing with these canned food over the wooden blocks. Perhaps these cans are different in sizes, shapes and weight. He fiddles with them, rolls them around and sometimes drops them to hear the sounds it makes. Thought this is a quick way to keeps young ones entertained for a while and also introducing them to different attributes of the objects.  What items do you use for building blocks other than wooden ones?

Friday, April 25, 2014

Pink Friday! Play dough fun

Sophie loves play dough and she loves pink! What a better way to spend a Friday afternoon playing with this while Luke is napping. 

All supplies can be found at home. It's homemade play dough (not gluten free)

Recipe for play dough as follows:
1 cup all purpose flour
1 cup water
1/3 cup salt
2 tablespoons cream of tar tar
1 tablespoon of vegetable oil
Sprinkle of cinnamon powder (optional)
Food coloring (your choice)

Combine all ingredients (except food coloring) into a pot and turn on the stove. Stir the mixture until it clumps up and forms a sticky dough (about 3 minutes)

Remove the dough and let it cool a little. Divide into portions and add coloring of your choice.

We usually play the dough in a tray and add a few items (rolling pin, beads, goggle eyes, etc) for her imagination to have free play.

Do share with me ideas on setting up a play dough activity that will entice your child to play. Cheers and have a good weekend!

Thursday, April 24, 2014

Alberto Giacometti inspired sculpture

This was a fun project for me instead of Sophie. Perhaps an older child will enjoy it better as it requires patience and certain dexterity.

Supplies:
Pipe cleaners
strips of aluminium foil
A ball of paper (for the stick man head)
Play dough or blue tac

Steps:
Take 1 pipe cleaner and make a loop in the center for the head. This piece will make the head and the arms

Take 2 pieces of pipe cleaners for the legs. Use the arms to secure them tightly. Twist the 2 pipe cleaners a few times to make the body.

Put a ball of paper in the loop and start using the strips of aluminium foil to wrap it.

To make it stand, attach balls of play dough and wrap the foil around. It is quite challenging making it stand after a few tries, it will find its equilibrium.